Hello, one and all!
Further to our post in early December: we have reached the finals for a Canadian Blog Award, and are now asking everyone to vote for us in the finals! We have been nominated in the Creativity etc. category, and we hope you'll take a quick second to vote for us!
It's super simple:
1. Follow this link: http://polldaddy.com/poll/5787390/
2. Click on Project: Priceless.
That's it! If you'd like to familiarize yourself with our blog, volume 1 is the wedding blog, and volume 2 is the Nest (of course) blog; head to http://www.projectpriceless.com and follow the links to both. If you'd like to learn more about the Canadian Blog Awards, you can go to http://cdnba.wordpress.com/about/ .
Thanks, everyone! And hey: spread the word by sharing this info! Voting closes soon! We appreciate your support and readership. It's much more fun writing all this stuff when we get to hear you love it!
Happy New Year,
Jordan and Brian

Tuesday, December 27, 2011
Thursday, December 22, 2011
Macaroni Angels: a DIY tutorial that will make you quake in terror.

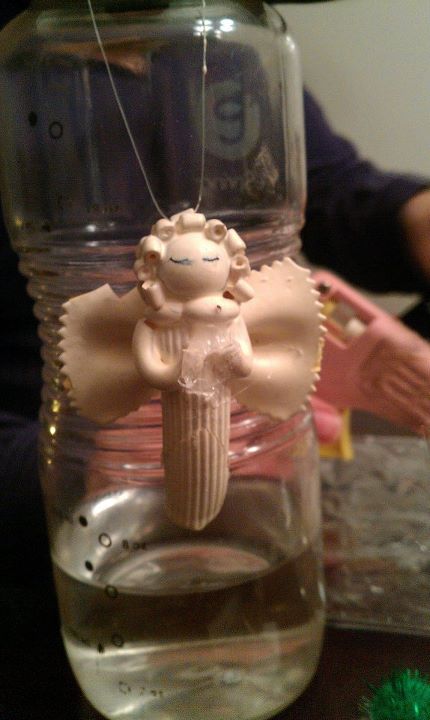
Mom slaved away for hours. Days, in fact. At the end of it, she had produced several dozen perfect little macaroni angels, made of four different kinds of pasta, white enamel paint, and wooden beads. I was too young to understand why I wasn’t allowed to help with this specific craft, and I have wanted Mom to do this one again now that I’m older and am certain I would be a better helper. So last Christmas, as the last two surviving macaroni angels were visibly chipped and damaged, I demanded we craft these anew. With a turn of good luck, Mom found the right farfalle, and we were good to go!
 |
| The last of the original angels. |
-three days of crafting
-four adults working on them
-one-and-a-half tubes of smelly glue
-enough ingenuity to create something far more useful, like a cold fusion machine.
Let me walk you through it.
YOU WILL NEED:
-farfalle pasta
-penne rigatoni pasta
 -gorgonzola pasta (or chop up macaroni into quarters)
-macaroni pasta
-E-6000 glue
-glue gun and glue
-wood beads for heads
-small beads
-white enamel paint (not acrylic)
-extra-fine tipped sharpie or other permanent felt tip pen
DAY ONE: ASSEMBLY
1. Use your E-6000 glue to:
-attach the head bead to the penne body,


-roll the head in the gorgonzola, after applying glue to the head, to make hair,


-glue on the farfalle wings,


-glue on the macaroni arms.


2. Let them dry, preferably for a couple days to be sure the glue is set and isn’t off-gassing.

 If you are a sane human being, you will make one, maybe two dozen of these. You will do it in a well-ventilated area. If you are absolutely nuts (or are aiming to become nuts), you will assemble 100 of these angels; you will also do the gluing part all in one go, on a cold day when it sucks too much to open a window. You will do it with your mom while your husband and your dad play with powertools in the basement, until they come upstairs and find the two of you giggling uncontrollably after two hours of inhaling glue vapors. At this point, the men will demand dinner and you and your mother will continue to titter, and attempt to engage in witty quips, like, “What’s for dinner? I dunno. You’re for dinner!” At this point, both men will take the glue away and hide any unfinished angels. It brings new meaning to the phrase, ‘Angels we have heard on high.”
DAY TWO: BEADS AND PAINT
3. Pull out your glue gun and glue a bead onto the head of each angel. This is where the string will go through.


4. String fishing line through each bead and tie a good knot. If you still have E-6000 glue (and your partner hasn’t hid it on you), you can dab the knot with some glue to make it permanent.
5. Hang the angels off of a dowel, broom, or other stick-like thing. This isn’t strictly necessary, but it helps detangle the fishing line.


6. Dip each angel, one by one, into the enamel paint. You may need to take a paint brush and fill in little areas that somehow elude the paint.
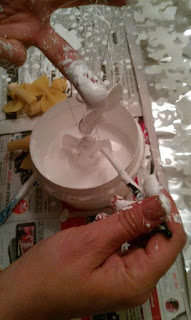


By day two, Mom and I realized we were outnumbered by the angels, and recruited Brian and Dad to help. How many A-type personalities does it take to paint 100 angels? The answer is four: one named Mom to dip and direct, one named Jordan to string the angels onto broom handles, and both to then harp at Dad to find more brooms, dowels, and sticks. Oh, and number four, named Brian, to quietly help string up angels, wisely keeping his mouth shut as the other three nag each other about the ‘right’ way to do this.


DAY THREE: FACES AND TOUCHUPS AND GLAMOUR
8. Inspect each angel, now dry (and no longer soggy, if you accidentally used acrylic paint), for any exposed pasta. Use a paint brush to fill in these little spots.

9. Grab your Sharpie and draw a little pair of eyes. If you look at our troops, every angel is a little different because no one could follow instructions; but I have more faith in you out there, so here they are: draw two smiles from two happy faces for eyes. Add some eyelashes if you feel like it. Now put the pen down.


We ended up having to paint over many of the angel’s faces and start again. There was just too much temptation for Brian, A.D.D. man that he is, to try out different faces. Somehow, whenever he veered from the prescribed eye-painting method, the angel would end up looking angry or unhappily surprised, like she’d sat on a tack. My dad couldn’t seem to get the knack, and my mother just kept painting the eyes the wrong way-up. I couldn’t believe it. The years have really mellowed my mom, who, twenty years earlier, made every angel meticulously identical. Her new que sera sera philosophy should have pleased me, but it turns out, I have inherited her perfectionist streak and so I found myself having minor heart palpitations as she handed over angel after angel with upturned eyes.
10. Hot glue fun things into the angel’s hands: harps, books, holly, pompoms, etc.

 A bonus of mom’s relaxed crafting mood: she was totally on board with putting all sorts of nonsense in the angels’ hands. When Mom made these angels the first time ‘round, she painstakingly glued a piece of creased ribbon into each of the angel’s hands to function as a choir book. This year, Mom and I went to the dollarama and gathered all manner of tiny decoration. Technically, I think it detracted from the angels’ classy-ness, as I’ve always seen Mom’s angels as the pinnacle of Martha Stewart-worthy crafting. But it was more fun, and it was a nice splash of sparkle.
SUCCESS: A HOST OF ANGELS

 |
| Oh, Boba Fett, what have you done. |
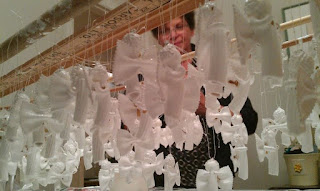
 In the end, we had one hundred perfect little angels. Do you remember that scene in Star Wars: Attack of the Clones when Obi-Wan Kenobi sees all the lines of identical storm troopers that those weird tall aliens have been manufacturing? Take a good look at the rows of angels. Yeah, there’s a parallel there. What I loved about this craft was doing it with my mom. I agree wholeheartedly with her that this is not a kid’s craft, so I completely understand why I couldn’t help out when I was little, though even then, it was fascinating to watch her work. But now, as an adult, learning one of my mother’s secrets arts, the experience had a feeling of deep importance. I have inherited my mother’s ability to MacGyver a pile of sequins, pipecleaners, pompoms, and toothpicks into an adorable chotchkie; and for this I’m eternally grateful. Mom’s ability to craft something out of nothing has always been an enviable brand of witchcraft that I hope I will one day master as she has done.
Next year, we’re going to make new crepe paper angel tree toppers. Mom’s is twenty years old and badly torn, and I don’t have a topper at all yet. This will require no toxic glue and we’ll only be making a couple, so I suspect it will be less of a gong show.
But I did enjoy the gong show.


 |
| Adorable! |
 |
| On the tree. |

 |
| Dad, monitoring the troops. |


 |
| . |

 |
| . |
 |
| Our little family, year 1! |
Tuesday, December 20, 2011
Gifts from Ottawa: shopping local & handmade for Christmas
Well, Christmas is the weekend upcoming, and you’re either all ready with your gifts, or you’re struggling. At the peril of having our families see their gifts, we are posting our presents online to help you out. So, FAMILY MEMBERS: Stop here. Do not read on. We don’t want to ruin the surprise for you. I mean it. Go away.
Okay, now that they’re gone.
You may have heard that we had a plan this Christmas to shop as local as humanly possible. We figured 90% was the best we could hope for, and I think it was a very fair goal. Here we are, all wrapped up, and we’ve managed to stay local, ethical, and relatively cheap! To help you see what we got and how, we’ve made a colour chart:
Note: prices with a star* beside them are approximate, either because they’re homemade, or because we lost the receipt and are working from memory.
RED: purchased at a local, independent shop or booth
 |
| For Brian's Mom. |
GREEN: handmade by us
BLACK: not from a local shop, not handmade.
FOR BRIAN’S MOM: Pampering and Prettiness
-Purple Urchin lemon & lavender bath salts, $12
-Purple Urchin chocolate face mask, $8*
-Candles, free in our Handmade Harvest earlybird swag bag, $0 (value $4*)
-Handmade angel decorations (tutorial coming!), $2 (approx. for materials)
-Card by Urbanfete, $4*
 |
| A Man Package, heehee. |
-Major Craig’s jerk chutney, $8
-Smoked steak spices by SMOKE, $7
-A big bottle of Beau’s Lugtread beer (not seen here—Brian drank it and has to replace it), $4*
 |
| Art by yours truly. |
…all in an old milk crate, because who doesn’t love a milk crate?!
FOR BRIAN’S BROTHER: Art for a young man’s first home
-Illustration of the XMen’s Rogue, by Jordan, with reclaimed frame, $0 (value of $150)
FOR BRIAN’S SISTER: ‘Girl’s night in’ package
-Purple Urchin vanilla soap, $5
-Thann hand soap, sea foam scent, regifted $0 (value $18)
-earrings, hair clips, and candles from our Handmade Harvest early bird swag bag, $0 (value of $15)
-Lush soap samples, saved from an event, $0
-Hair smoothing serum, regifted, $0 (value of $20*)


FOR JORDAN’S MOM: All her favourites.
-Thann ‘oriental essence’ massage and bath oil, $31*
-Thann sample sized aromatic wood products, grudgingly regifted, $0
-Purple Urchin ‘absinthe’ bath bombs, $4 each
-Cookbook, Eat, Shrink & Be Merry (as requested) $30
FOR JORDAN’S DAD: Zombie fun, candy, and a mill he’ll love.
-Walking Dead graphic novel, from the Comic Book Shoppe on Bank Street, $10*
-Zombie-smiting machete (also useful for bushwhacking), from SAIL, $10

-Giant box of Toffifee from Canadian Tire, $7
-Peppermill from Great Canadian Superstore, $8*
 |
| Mug, painted by moi, for Dad. |
FOR JORDAN’S BROTHER: The Julia Child fanatic
-Brie melter, regifted, $0 (value $15)

 |
| Knitting bowl for MJ |
-Handmade ceramic knitting bowl, Wabi Sabi, $30 (yarn feeds through and doesn’t tangle!)
-Angels handmade by us, $2 (materials approx.)
FOR FRIENDS AND SPECIAL PEOPLE: Angels!
-Angels handmade by us, many many sets of them! (30 angels’ materials approx. $15)
BRIAN AND JORDAN’S GIFTS TO EACH OTHER:
Neither of us trusts the other. You’ll have to wait and see, just like us.
BONUS: DAD'S GIFT TO MOM (A GREAT RECOMMENDATION ON A LOCAL STORE IF YOU'RE STILL SHOPPING):
Dad is getting Mom something from Magpie Jewellery this year, and I have to say, we LOVE this shop. I've loved it since its opening at the Rideau Centre, and now that there's one so close to our house, it's a dangerous place for me to go. If you go, I heartily recommend talking to Sarah McEown, the staff person who helped us with Brian's wedding band for our wedding. Another rockstar staff is Laura. As a whole team, though, I find the customer service wonderful, and they are really helping Dad out this year, getting a special something ordered in, through rain and sleet and dark of night. They have a wide range of prices from $8-$800+, so there's something for all, even men.That's my little holla to Magpie. :)
BONUS: DAD'S GIFT TO MOM (A GREAT RECOMMENDATION ON A LOCAL STORE IF YOU'RE STILL SHOPPING):
 | |
| Holly Yashi, only at Magpie |
SO HOW DID WE DO?
-We spent about $207.00 total for about 18 people’s gifts. That works out to about $11.50 per person.
-Because we saved lots of money on certain gifts, we were able to spoil people in other areas.
-We managed to keep our gift giving to minimum 80% local and/or handmade.
It was harder than a regular Christmas shopping program, that’s for sure. There were several times I wanted to just go buy something at the mall, and in fact, I plan to walk around a mall this week because we haven’t stepped foot in one all season and I’m feeling a bit…left out. But the gifts we have are so much more unique than we would ever have found in large-scale commercial stores, so it was totally worth it. I was worried when we started that we may end up buying a lot of gifts that were more focused on the ‘where did you get it’ than ‘who is this for’ aspect of gift-giving, but luckily we didn’t have to compromise on personalization to keep our goal of supporting local stores and handmade wares.
HOW TO DO IT YOURSELF:
I have blogged two recent guest posts on the UsedEverywhere blog that will help you out a lot:
The first was titled, The art of meaningful gift-giving; it will give you some great tips on how to give wonderful, personalized gifts that go above and beyond without needing to be pricey.
The second one to check out is titled, Smart gift giving, and is all about ideas on how to gift locally, ethically, and frugally.
LOOKING BACK: HOW WAS IT?
I would do it again. I will do it again, but I will accept next year, early on in the season, that there are certain people that want things which can only be found in larger stores; that’s okay, we all have things we like that don’t come from Mom & Pop shops. (If you think you’re above this, ask yourself if you sigh with envy whenever your colleague whips out her fancy tablet.)
It was fun, and with the exception of having a horrendous experience with the ceramic markers for making Dad’s cup, it was very relaxed. We didn’t have to fight through one single crowded parking lot, and we got to visit shops and crafters that we personally love. By keeping our spending local, it felt like Christmas was happening for everyone around us: for ourselves, for our loved ones, and for the local businesses who were so happy to have our business. I think we’re feeling pretty Whoville about the whole experience, like Christmas really can be about community.
Now let’s all hold hands and sing before the roast beast.
Sunday, December 18, 2011
Moxley Monday: Nutrition course wraps up and Jordan fears fat
WEEK 4 OF MOXLEY MONDAYS: WE WRAP UP WITH FAT
Heather Moxley is a registered holistic nutritionist here in Ottawa with a private practice, and she recently offered to have me attend a four-week nutrition course that she offers. I (Jordan) am blogging the experience as I take this important step towards our NEST goal of feeding ourselves. This is Week Two. You can also follow Jordan's twitter journalling of the experience with hashtag #jordaneats; click on the hashtag to see a Visible Tweets feed, but hurry: tweets do expire.
This was my last week of the Heather Moxley Nutrition 101 course…and possibly the most challenging chapter, because it was all about fat: consuming it, on purpose, for greater health. Crazy, you say? Apparently not.
WHAMMY MOMENTS OF THE WEEK:
 |
| Grapeseed oil. Source here. |
Heather broke fats down into a bunch of categories. I tried to remember this chapter the next day and found myself floundering, I think because it was more abstract than the other ones. Luckily, I have a workbook from the course I can refer to, and I brought it with me when I went to Bulk Barn today to buy a bunch of things I’ve never bought. What I did understand right away from that night’s course was that things like olive oil can actually be good for you, and you should ideally ingest 4 servings of these (unsaturated) fats daily. Oh yeah: and eating a fat family called MUFA fats will actually make you lose weight. Are you gobsmacked? I am!
I’m having some serious trouble with this ‘fat is fine’ concept, but I’m trying to follow it. I know that when I was training for roller derby, I started to have some health issues and I remember learning that I needed to increase my fat intake. It’s a bit more complicated when you have a sensitive tummy, sans gall bladder, that has difficulties with fat; but the quantities are very low, and there’s a world of difference between having some salad dressing, and eating a super-size fry.
 |
| Here, fishy-fishy-fishy. Source: here. |
HEATHER MOXLEY’S COURSE: A RETROSPECTIVE
I was pondering this final post this week, as I stood in my kitchen eating handfuls of Cheezies from a party-size bag. (It’s the course’s fault: all the talk of corn made me think of my favourite hydrogenated-oil-evil-corn-byproduct-and-fake-cheese snack, the simple puffy Cheezie.) I realized that I haven’t kept track at all of my weight or inches through this course, but I feel healthier than I usually do in December, and I’m having fun in the kitchen, trying to adopt food combinations and new grains and proteins. It feels like a science class, in truth; on one hand I’m thinking about flavours and what would be yummy, but on the other I’m trying to weigh out how I can make that classic yummy taste with new, healthy ingredients. I wish I had some beakers to measure out my quinoa.
I truly loved taking this course. Heather Moxley is absolutely incredible, a tiny powerplant of energy and excitement. She never berated anyone for struggling with their homework, and she could genuinely laugh at things like the one night I was headed out to a cupcake tasting right after the carb lesson. Listening to Heather explain about foods and their chemicals, I had utter confidence in her abilities, and I knew right away that she loves what she does. It’s funny: I’ve been watching Heather on CTV Morning segments for quite some time now, but I thought she was a pretty serious, stern lady from the clips. In person, she has a ready laugh, a curious mind, and an eager excitement to help people understand their bodies, which seems to make her glowingly happy.
My only wish for this course: that it could be twice as along, with two weeks on each subject instead of one. I feel like there are a hundred questions I didn’t get to ask yet, and I also needed more time to adopt some of the food practices. Of course, it’s up to me now to keep it up and keep pushing myself to reach for the hummus and fear not the fat. My hope is that in the near future I will be able to return to Heather Moxley’s offices to learn about taking care of a gall bladder-less digestive track.

I’m going to take things slow and be respectful of my irritable bowel, but I think that in just four weeks, I managed to learn more about my food than I’ve learned in my first 29 years combined. And maybe what’s even more important: I learned it in an interesting way that made the information fun, intriguing, and accessible.
I can’t thank Heather enough for this wonderful course, and for giving us a chance to learn about taking better care of ourselves. This course represents a significant step in our goal to Feed Each Other, a step that may not have happened without intervention.
If you think you may be ready to learn more about your food, to stop fearing fat, and to take better care of your insides, I recommend getting on board with a course at Heather’s clinic. There’s a stress workshop in January, and different stuff all the time. Look at the positive: if you’re like me, you’ll leave this course eating more yummy food than you let yourself eat ever before.
If you’re still not sold, I should tell you that Heather encourages the eating of dark chocolate. She’s even holding a Valentines chocolate workshop. Yeah; I knew that’d get ya.
Friday, December 16, 2011
A True Christmas Tale: Jordan's dad tells a real Santa story.
Is there anything as overwhelming as the love we feel for our parents, when we get to an age where we can really appreciate them?
My dad has been harassing me for weeks to write out a particularly special Christmas story from my childhood on the blog. I haven't had time to work on it, because of my long work hours. The other night we chatted on the phone and I was really bummed out about work stress. Unable to help with the work stress itself, my dad went to work writing this blog post. He sent it to me, and it's perfect, so I'm sharing it with all of you. Hopefully it will help you get into the Christmas spirit.
This is a true story. I have never been able to get my parents to admit to having a hand in the matter. You won't believe it, but it really happened.
JORDAN'S DAD, BILL, TELLS A TALE OF MEETING THE REAL SANTA CLAUS.
Merry Christmas!
-Bill Kent
What do you think? Stranger than fiction? Cool? Crazy? Comment below!
My dad has been harassing me for weeks to write out a particularly special Christmas story from my childhood on the blog. I haven't had time to work on it, because of my long work hours. The other night we chatted on the phone and I was really bummed out about work stress. Unable to help with the work stress itself, my dad went to work writing this blog post. He sent it to me, and it's perfect, so I'm sharing it with all of you. Hopefully it will help you get into the Christmas spirit.
This is a true story. I have never been able to get my parents to admit to having a hand in the matter. You won't believe it, but it really happened.
JORDAN'S DAD, BILL, TELLS A TALE OF MEETING THE REAL SANTA CLAUS.
This is a story for all those people who have foolishly lost their belief in good ol’ Saint Nick. Both my wife and I will swear on a stack of bibles that this is a totally true story. My children had reached that time in their lives (10 and 12) when the Santa Crisis occurs: friends, school, and television, coupled with pre-teen observation, had brought them to the conclusion that perhaps their parents were somehow involved in the gift-giving process.
It was December 23rd. My wife and I decided this might be the last time we could visit the ‘mall Santa’ and have any chance of rebuilding Jordan and Mike’s flagging belief. We set out in our mini van after convincing the kids we needed to do this as a family adventure. Of course, Sue had told them I would be heart broken if we didn’t go and I had played the same guilt trip on them only moments before. I think they came along just to shut us up.
Our first stop was our favourite shopping mall but all that was left was an empty throne. “Oh,” I said, “Santa must be feeding the reindeer!” To the parents out there, let me ask: do you remember those times when your kids give you THAT LOOK? You know, the one that says you’re a complete lame-o? Well, we went to three other malls and no Santa at any of them. Of course, I continued to point out that this validated my hungry reindeer theory, but we were getting desperate. It was 8:30pm as we raced towards the Lincoln Fields mall. “Give up, Dad, they never have a Santa!” “The Santa, not a Santa!” I said indignantly.
As we walked into the mall, Sue and I were truly sad that we had missed our last kiddie Christmas with the kids. Just then, we turned the corner and there, sitting on a chair, was Santa Claus. No throne, no cattle corral, no elves; just Santa. Well, not just Santa, but the best Santa we had ever seen. Even his beard was real. Santa hollered, “Jordan, Michael, where have you been? I have been waiting all night.” Now I must admit, I have run some great scams on the kids in the past but as they gave me the evil eye that night, both Sue and I said we had nothing to do with this. “Come on and get up on my knee you two, I don’t have much time!” Santa said.
For the next 10 minutes, he talked to them like he had known them all their lives. Then he said he had to get home to the reindeer (Ha! Feeding time, I smirked). As we piled into the van, the kids thanked us for organizing such a great Santa. We told them we had nothing to do with this, and it was true! We truly had no hand in this. With little patient smiles, they said thanks once again.
Later that night I asked Sue if she had organized this. She said it had been my idea to go to Lincoln Fields, not hers. The next morning, Sue called the office at the mall to thank them for having such a great Santa. The secretary said, “Sorry ma’am, we didn’t have a Santa yesterday.”
To this day, none of us can explain what happened that night; but I have never heard a single word of doubt about the existence of Santa after that.
Merry Christmas!
-Bill Kent
What do you think? Stranger than fiction? Cool? Crazy? Comment below!
Wednesday, December 14, 2011
Flower Power: DIY festive flora without the usual poinsettias


ABOUT CHRISTINA
Christina has been in the floral business for quite some time, but opening her own shop has allowed her to really run with her crazy ideas. Why is the Flower Factory such a popular florist’s shop? Because Christina will turn anything into an arrangement. For our wedding, I requested that Christina make us bouquets that had absolutely no petals in them—with the exception of calla lilies, which are really just one petal. Without a moment’s hesitation, she agreed…and wow, did she deliver. The bouquets were made up of Scottish thistle, peacock feathers, silver sage, weird green berries, and the middle parts of echinacea flowers with all the petals pulled off. They were gorgeous, and without a doubt I can say that Christina is the only florist I know who can captivate my interest.
 And this is exactly why the Flower Factory has a devoted following of customers and brides: if you want an arrangement that will be unlike any other, this is the place to go. I’ve seen Christina use limes, moss, even broccoli to make her magic happen. Inevitably, like a good improv team, Christina manages to combine the most absurd elements into a perfectly logical, playful finished product.
 TIPS FOR HOME FLORISTS
Christina had some great suggestions for the florist-wannabe who is looking for clever ways to keep costs down and DIY their own home arrangements:

YOUR OWN BACKYARD:
See what’s growing near and around your house. A short walk can provide you with dogwood, evergreen branches, pinecones, and sumac. Those who live in the Pontiac region can also seek out ilex berries, which Christina swears would be a lovely addition.
CONTAIN YOURSELF:
Clever arrangements can be done in dollar store vases, or better yet, repurposed tin cans and mason jars. Buy or gather some river rocks and fill the container for support and pizazz.
 GROUND IT:
Something larger, heavier, or with more substance can be used to ‘ground’ the piece, says Christina. Some Christmas balls, a snowman or plaster creature may sit comfortably in the basket or pot, and you can build your whacky sprays of branches, twigs, and asparagus off of that. (I’m absolutely certain that Christina has used asparagus many times.)
COLOUR AND TEXTURE:
Choosing a colour palette can be tricky. Easy and sure-fire palettes for the yule season are all-white or all-red arrangements. So how do you make it interesting when it’s all one colour? Christina tells us that texture is key. A shiny leaf with a velvety moss and some spiky blossoms can say a lot without flashing different colours.
WHEN YOU’VE GONE TOO FAR:

WHAT TO BUY:
So you’ve gathered your cedar branches, pine cones, an antique angel tree topper, and…you’re stumped. Not a problem. This may be the time to head into the actual flower shop and pick out something special. Christina recommended cymbidium orchids as an example of a long-lasting bloom: these babies last for 3-4 weeks, and there’s lots of blooms on a stem, so if you want to you can buy an entire stem. It’ll set you back by $100-and-some dollars, but if you’re doing ten arrangements with them that were otherwise free from the forest, that’s a fabulous price. Or opt to just buy a couple blooms for that special centrepiece.
CHRISTINA’S GENERAL TIPS FOR HAPPY FLOWERS:
1. Keep things in water to avoid brittleness. This includes branches.

3. Fill your vase with warm-almost-hot water. There’s less oxygen in hot water, and the plant will suck it up better.
EASIEST TUTORIAL EVER: Orchid with a halo
Christina wanted to show us how easy it is to make a stunning arrangement, so she walked us through this simple one. I’ll tell you right now, Brian does a better job on his than I do. I almost lost an eye several times. I turned my back for two seconds, and Brian had created this glorious Ikebana-like thing. Sometimes it's so easy to hate him.

-willow branches (or other bendy, well-watered branches)
-wire—coloured, plain, or wool-covered, it’s up to you!
-a small glass vase, wide and low
-rocks
-1 cymbidium orchid
-decorations as desired
1. Grab the willow branches and twist them into a halo that will fit snuggly around the vase. Use wire to keep everything together. If you’re Jordan: fail at this and instead jam the halo, which you made too small for the vase, right into the vase.
2. Place some river rocks or plastic ‘gems’ into the vase. If you’re Jordan: realize your willow is in the way, pull your willow out, place the gems in, then put your willow back in.
 |
| Jordan's finished product. |
4. Pour warm-almost-hot water into the vase, then add your orchid after you carefully use a very sharp knife to remove it from the stem on a diagonal. If you’re Jordan: leave the cutting to someone who won’t cut off their fingers.
5. Your arrangement is done; just wrap it in cellophane if you’re taking it outside, and add another plastic bag if it’s really cold out. If you’re Jordan: surprise a friend with the arrangement and pass it off like it’s no big deal and you just whipped it up without breaking a sweat.
 |
| Brian's perfect creation! |
 |
| . |
You can find the Flower Factory at 180 Plaunt Street, Unit 4, in Renfrew, Ontario. Check out the Flower Factory Facebook, and follow Christina on twitter.
Subscribe to:
Posts (Atom)