Showing posts with label Frugal. Show all posts

Friday, September 28, 2012

The NEST eats: Ottawa Farmers' Market, part I

The Ottawa Farmers' Market ROCKS.
Ottawa is a lucky city: we are surrounded and saturated with fantastic farms, apiaries, sugar bushes, and countless culinary artisans. It's the kind of city where you could conceivably eat year-round without ever heading to a traditional grocery store, and that's pretty impressive. Brian and I try to support local as much as possible, but it's a learning process: you've gotta get out there and discover what's available right in your own back yard! So when the Ottawa Farmers' Market showed up with a basket of goodies for us to try out, we were thrilled to participate. This is part I of a two-part post about the goodies we tried from the Ottawa Famers' Market.
What is the Ottawa Farmers' Market?

The Ottawa Farmers’ Market has grown to over 100 vendors of the best locally-grown and locally-made food, farm products, arts and crafts within 100 kilometres of Ottawa. Now in Westboro, Brewer Park and OrlĂ©ans, the markets boast some of the City’s favourite artisans – Pascale’s Ice Cream, Art-Is-In Bakery, Flatbread Pizza and the Hot Potato Company, not to mention more Savour Ottawa certified growers than any market. 
Ottawa Farmers’ Markets promote healthy eating and the local farmers who feed us.  The markets support the local economy – farmers, chefs, crafts people and entertainers – while providing the public with an opportunity to get outside, learn about local food and culture, and to buy the freshest, local products the season has to offer direct from the people who produce it. 
Head to their website to find out locations and times, including their Brewer Park and Westboro spots!

EASY DINNER: CHEESE AND MEAT


When we opened up the package, our noses were assailed by a rather intense burst of stinky feet smell. We were delighted to discover this was emanating from two varieties of gorgeous cheese, made by Glengarry Fine Cheeses. The first one we grabbed was the beautiful blue cheese; it turned out to be a wonderful treat, very flavourful but not overpowering. I threw it into a whole-wheat penne dish with olive oil, seared kale, and roasted sunflower seeds--now posted, and titled Penne From Heaven. The cheese was the star of the show; I didn't even have to add any spices for this dish to have major flavour impact. Mmmmmm!

At the last minute, I also ran out and grabbed the Bearbrook Farms Kolbassa that the Farmers' Market had sent us. This stuff is amazing, people. Its flavour was a cross between salami and ham, and the piquant spicy flavours made me think of a late summer harvest. We tossed some cubes of this into the pasta as well, and found ourselves rolling our eyes in delightful pleasure as we chewed.

SWEETS AND SAVOURIES 


For dessert, we basically ate jam off of spoons. I kid you not. How could we resist, with four Michaelsdolce jams sent to us? We hadn't actually had Michaelsdolce before, though we'd heard a lot about it, so as a jam fanatic I was excited. Every flavour lived up to Michaelsdolce's reputation for being clever, complex, and delightful. Here's a quick rundown:

Kiwi-lime: 
This beautiful apple-green jam is sweet with a serious citrus kick. The tart bite at the end reminded me of genuine key lime pie that I've had in Key West. The jam was dessert-y, but also palette-cleansing. It reminded us of a mojito, and if you ask nicely, we can provide you a recipe for one using this jam. 

Blueberry & lavender:
One of my favourite things is lavender in food, and this jam wowed me. Made with real Nova Scotian blueberries, this jam was so sweet, you can literally taste the blue. The lavender flavour was subtle but created an almost smokey taste, a bit like eukalyptus or rosemary. This jam is light on the palette and calls for fresh scones. 

Strawberry & Balsamic:
What a jam! The balsamic is primarily evident in the aroma--and if you're not take a good sniff before eating each of these jams, you're missing half the show. The vinegar pairs with the strawberries to create an almost rhubarb-like flavour. Brian suggested it would go well with pork, so on a lark we tossed some on a slice of the Bearbrook Kolbassa, and sure enough it was fantastic. I also think, though, that it'd spruce up a bowl of vanilla bean ice cream in a very special way.

Citrus Ginger Marmalade:
I LOVE marmalade, and this one is definitely my new favourite. The simple citrus aroma does nothing to prepare you for the bitter, kicky flavours of orange pith, and the warm heat of the ginger. Brian said it called for a bagel with cream cheese, but personally I'd eat it on a thin, crispy slice of light rye bread.

Glengarry's blue cheese.

MORE CHEESE, AND HONEY


We finished up our evening of fine home dining by devouring the Glengarry Fine Cheeses goat cheese and the honeycomb provided by Halsall's Honey at the Ottawa Farmers' Market. Much to my surprise, the goat cheese was actually the stinkier cheese of the two we tried, but the flavour was quite lovely. It is a hard, more crumbly cheese with a mild but bitter flavour, short on the palette but lots of flavour. At the suggestion of Tara from the Market, we popped pieces of cheese into our mouths while gnoshing on chunks of the incredible honeycomb, and the pairing was superb.
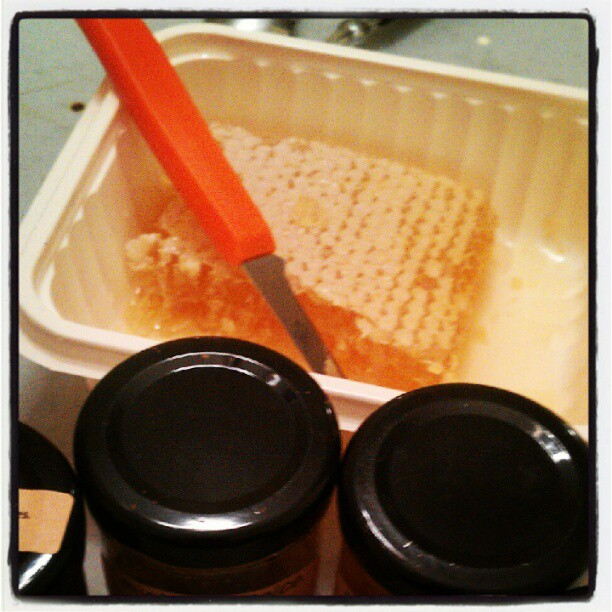
Let me talk about that Halsall's honeycomb for a minute: I am still carefully, lovingly, rationing it out. If you've never eaten honey straight from the comb, I heartily recommend you try it, because it's always an amazing taste sensation; but this particular honeycomb was really very excellent. I shared some at work, and the response (from honeycomb virgins, no less) was always the same: this is the freshest-tasting honey they've ever tasted. 

Brian suggested that a lovely picnic snack could be made of a fresh french bread, a hunk of that goat cheese, and this fine honeycomb, paired very nicely with an Indian Pale Ale or a Belgian Wit beer. 

Maybe the most stunning item in the basket of goodies we are reviewing is the cutting board, by Joseph Henri. This beautiful piece of workmanship is what I used to create my Penne From Heaven meal, and we're leaving it on display in our kitchen. I love the idea of picking up one of these for a wedding gift or Christmas present for someone who takes pride in their cooking. 
Part II is soon to follow, and includes some lovely personal care products, as well as dulce de leche, pickles, and grapes. Sounds like a perfect night in by myself, watching Pride & Prejudice and painting my toes. Stay tuned for more local awesomeness. Because nothing rocks more than our local artisans and farmers.


Thursday, September 20, 2012

Frugal NESTing: MJ's Bedroom Makeover

My beautiful BFF. And talented, too!
We have a special guest post today. My bestie, MJ, recently decided to paint her room, and I was blown away by her creativity on a very tight budget. When I saw the pictures and was blown away by the transformation, I begged her to write a post because we're so into frugal DIY projects here on the NEST. Without further ado, here's...

MJ'S BEDROOM MAKEOVER


BEFORE: ugly, ugly weird colour.

I live in beautiful part of Toronto, filled with huge trees and a big park right beside the townhouse where I rent a room.  There are so many trees that on the sunniest of days I can always find plenty of shade to cool off in.  This is a wonderous and amazing thing.  However, my room was painted a dark, dusty rose kind of colour which a) could maybe be a nice accent colour but not nice for four full walls and b) between the colour and the glorious tree canopy meant that I needed a lamp on by 3pm and if it’s a rainy day then all lights must be on.  With the days getting shorter the time to paint was now!

BEFORE: such a dark space.
The only thing slowing me down was finances.  I took my Darth Vader piggy bank and shook out all the quarters and loonies that I’d been saving for the past two months and combined that with the last $20 in the bank.  Armed with a $50 budget I headed off to Home Depot.  I went straight to the mis-tints hoping to score a usable colour that no one else had liked and found a gallon of a decent leafy green for $9!  A nice green but again, not four full wall nice.  I knew covering the dark rose colour would be challenging and I would need a lot of paint to cover it up.  Hooray!! An 8L pail of white primer on sale for $25!  I grabbed a combo pack of rollers, a tray and edging brush on my way to the cash and the total cost was $50.79.  Score one for the savvy shopper!

AFTER! Bright, cheery, and matchy with the bedding!
I got home, put half my furniture onto my balcony and cramming everything else into my closets and began the transformation.  Remember how I was a super savvy shopper and was a mere 79 cents over budget?  Do you know what happens to the savvy shoppers who save by not buying a drop sheet?  They flip a tray of white paint off the top of their entertainment unit onto the dark blue rug.  I tried using harsh language to clean it up but weirdly that didn’t work.  I scooped up as much as I could and threw a towel over the rest and kept on going.  I couldn’t unflip the tray, it was what it was and momentum could not be lost!

Two coats of primer covered the white well enough to suit me until I find a colour I really like and can afford to buy it (and a drop sheet) and I used the green for the base-boards and trim on the closets. Well, I will do the trim on the closets. I saved  money by not buying tape either and after one experimental square it’s clear that without it the transformation will resemble a first grade art project.

My room is %100 brighter and homier now and I even managed to create more space when rearranging the furniture after.  I hung up my guitar and a bit of art and now it feels like my own happy, cozy space. Extra bonus in life is that my landlord is not even a bit mad about the carpet and is changing it soon anyway. Yessssss!

You can follow MJ on Twitter, though she doesn't say much, but when she does it's pretty profound. Kinda like Silent Bob. Find her at @tinypiesrtarts


Sunday, August 12, 2012

Building the Nest: Bathroom woes


I swear, there was a bathroom here when I left last night.

I remember moving boxes into this, our new house, in preparation for the final big move at the end of the month. I remember looking in this bathroom and thinking about colour choices.

And now, less than 24 hours later, I come in to find…that.

To be fair, I had gotten a quick phone call from Dad while I was at work that morning. He said that the leak—the tiny leak from the tub that was supposed to require only a tiny patchjob—had not been as simple as predicted. The hot water pipe, not the drain, was the leaky culprit. This meant, apparently, that the wall had to be torn out a little bit.

Of course, when they tore out the wall and found that a previous owner had filled the wall behind the tub with newspapers instead of insulation, that required more demolition.

I should be grateful, and I am, that Brian’s brother is a drywaller. Because I came into the house, saw, the bathroom, and then walked right back downstairs to the kitchen, where I painted a first coat on all the walls; and by the time I was done that, the boys had put up walls again, and installed the (new) tub. Why a new tub? Because the previous owner had painted the old one by hand and it felt like sandpaper. And because once you’re redoing the whole damn bathroom anyway, you might as well replace the tub while everyone is helping out. It was a project we’d planned to delay, but sometimes you don’t get that luxury.

I’m calmer about it now, though the newspaper discovery resulted in the vinyl shower stall being torn out and destroyed, so now we’re also going to be tiling. I am not exaggerating when I say that our teeny tiny repair job has quintupled in price.

I’m grateful for Brian and his brother, who both have been through house renos with their parents. And I’m grateful for my dad, who played foreman and helped Brian sodder pipes together. (Did you know people can soder their own pipes? Neither did I.) I am also grateful for my mom, who, I’m told, brought the men lobster rolls and veggies to keep them fueled.

I am grateful for credit cards, and carefully crafted spreadsheets that will help us pay back said credit cards.

I am grateful for my old pug Mr Darcy, who sat by me while I turned off my brain and painted the kitchen. I am grateful that he’s such a dork, because he amused me by getting yellow paint all over his butt, then managed to mascara all his whiskers in blue by sniffing a freshly-painted table.

We will look back on this and laugh one day. But right now, I just sigh.

Keep Calm and Paint On.

KEEP CALM AND PAINT ON


Tuesday, August 7, 2012

Furniture Makeovers: painting old wood with Jordan


We spent the weekend at the new nest, working on things like wiring and installing a dishwasher (okay, Brian was doing that, not me), and revamping old furniture to make new treasures for our house (that was me). As I worked on two very different dressers in the backyard, I thought about what tips I can offer up for the amateur furniture makeover artist. I’ve got a long history with refinishing furniture (in the past, I’ve done some pretty cool commissioned paintings on furniture), and I’ve found there are two ways to refurb an ailing wooden treasure: the fast way, and the right way. But don’t despair: there’s a time and place for both.

PAINTING OLD FURNITURE: THE FAST WAY OR THE RIGHT WAY?


Refinishing furniture can be a complicated, smelly, toxic, messy, onerous task. Doing it the right way usually follows these steps:
1. Remove old paint
2. Sand
3. Apply primer
4. Sand
5. Apply paint, and sand again if needed
6. Clear coat

Dresser 1: BEFORE
The fast way goes like this:
1. Paint and pray

I usually follow the ‘right way’ when I’m doing a commissioned piece, but when it’s just for me, I have a third method which feels like a fair compromise:

COMPROMISE: JORDAN’S HALF-FAST FURNITURE REFINISHING


1. Sand the piece with rough paper and a mouse sander
2. Prime
3. Paint
4. Clear coat

TIPS FOR FURNITURE MAKEOVERS


Here’s a few tips I’ve learned, primarily through trial and error and misery:

Dresser 1: AFTER!
a. SPRAY PAINT IS NOT ALWAYS THE ANSWER. Spray paint needs a lot of coats to be effective, and tends to chip or scratch. If you want a brushstroke-free finish, use a roller with ‘real’ paint.

b. TYPE OF PAINT COUNTS. I buy a lot of ‘mis-tints’ at the hardware store—paints that have been returned because the colour was wrong, and are then sold super-cheap—but I always check on what type of paint it is. For furniture, a semi-gloss is better than an eggshell finish, though your clear coat will help with this as well.

c. QUALITY IS KEY. Choosing a higher-quality paint may mean the difference between one coat and three. This means in the end, the higher-quality paint will actually save you money.

d. TAKE BREAKS BETWEEN STEPS. Water-based paints need three days to off-gas, and oil-based paints need a week. This means that, no matter how dry your paint seems, it’s still releasing gasses for 3-7 days. During this time, do NOT apply your clear coat; you risk accidentally pulling off the paint, and you can end up with a finish that easily chips or peels.

Dresser 2: BEFORE
e. TAKE RISKS ON THE TRASHY STUFF. The blue dresser seen here was free, found on a street corner, in terrible shape, and headed to the trash. The creamy one was purchased (for a whopping $20), is more unique, and is higher quality. So naturally, I did the risquĂ© paintjob on the cheap/free dresser, and did the ‘safer’ colours on the more expensive piece.

f. CONSIDER LOCATION. The creamy dresser here will now be used as a buffet/sideboard in our dining room, while the blue dresser is indeed still a dresser. But many people pass up great deals on furniture when they think they don’t have a spot for it. I’ve seen adorable high chairs made into plant stands, TV stands made into benches, and dressers made into kitchen islands. Don’t get stuck thinking about furniture as a one-trick pony; it can be as versatile as you like!

Dresser 2: AFTER
g. TO PAINT OR NOT TO PAINT? My dad cries a little every time I paint a piece of furniture. The reality is, many of the pieces I salvage were going to end up in the landfill if I didn’t paint them up. Yes, that ancient dining room chair might be a pricey piece if you could ever find a buyer, but sometimes no one is looking for one raggedy old hoopback. Painting it up and revitalizing it may give it another twenty years of life in a person’s home. People who freak out every time someone paints a chair are probably the same people who say women shouldn’t have to colour their grey hair: I’m sorry, but some of us just aren’t ready to look our age.

Look at those painty, painty hands.
On the flipside, of course, some pieces should be left well enough alone: church pews, cast iron sewing tables, and things handmade by your great-grandpa may deserve to be properly refinished by a professional. Ask yourself: is the look of the wood what gives this particular piece its magic? If the answer is yes, put the paintbrush away.

That’s just a few tips to get you thinking and hopefully get you feeling a bit more courageous! Worse-case scenario, you have to prime and paint again. Relax, folks; it’s just furniture. Now see what you can create!

Sunday, July 29, 2012

Better In An Hour: Easy upholstery

Behold, our ugly red vinyl footstool. (Forgot to take a
photo rightside-up.)

UPHOLSTERY FOR LAZY PEOPLE 

It's been a while since we did a DIY crafty post, but don't fret: since we're getting the keys to our new house on Tuesday. Here's a small project that saved a little footstool from the trash:

Behold, my ugly footstool. Find your own similarly-shaped piece of furniture--a footstool, a padded stool, or something else entirely. This style of upholstering won't work as well on, say, a stuffed couch; look for something smaller, with a wood base to receive the staples.

YOU WILL NEED
-an old piece of furniture (ie footstool)
-a staple gun and staples
-a piece of fabric
-scissors
-foam, yoga mat, or other padding

First, we cut the yoga mat up. We used an old, thin, unappealing yoga mat to add padding to the stool, as the original padding was worn down to nothing. We cut three ovals of yoga mat out with a pair of scissors after tracing the footstool onto it. This step took 5 minutes.


Next, we stacked those onto the stool; we then took our piece of fabric and put it on top. Then we flipped the stool over, and began stapling the fabric to the bottom of the stool. This step took 15 minutes.


You'll likely need to keep adjusting your foam/yoga mat pieces to make sure they haven't shifted out of position. There's a knack to going around turns or corners, too: create tiny, intentional folds, and staple them down. On the straightaways, you can just go straight and tight.

Lots of staples for a secure attachment!


Cut off any excess, add any staples you need to, and hammer in any staples that didn't quite jab all the way into the wood. This step took 5 minutes.

And there you have it! A much more attractive footstool than the one you started out with!   And, in total, this entire project took 25 minutes. Now, at some point we will be painting the legs, which I estimate will take another 30 minutes to properly sand, prime, and paint.

Not bad, eh!

Simple, easy, and good for us lazy people. Just my kind of DIY makeover.


Tuesday, July 10, 2012

The NEST in NS: we've arrived!


ENTER: NOVA SCOTIA


Everything we fit into the Focus...plus another guitar
and another suitcase, actually!
Two days. Two days of endless driving in an eerily straight line.

I can’t tell you how many naps I had…mostly because they all strung together into one endless snooze.

I intended to drive. I really did. But Brian didn’t want to share the wheel, and he kept turning down the A/C on my side of the car, where I was nestled up in a shawl…he’d pet my head, play some classical music…and suddenly, another two hours would have gone by.

I can’t really complain; I’m sure I’ll drive a bit on the way back. It’s more likely, now that I’ve caught onto the climate control trick, anyway.

Dad with his babies.
The first day was a fairly straightforward one, stopping for lunch at a McDonalds and making a motel room picnic out of a grocery store chicken. The second day, however, provided us with more tourist-worthy experiences. First off, we stopped at an Irving truck stop for some lunch; I’m told these truck stops are a quintessential part of the East Coast experience. Brian had a lobster club sandwich, so that seemed pretty quintessentially Easterly to me.

Then, making good time, we decided to stop at Magnetic Hill, New Brunswick: this strange place, historical and very weird, seemingly pulls vehicles up the hill by some sort of voodoo magic force. (Or magnets, whatever you prefer to call it.) We parked with the car in neutral at the bottom of the hill, and sure enough, it pulled that sucker up up up to the top. Unbelievable. There’s a video, for those who don’t believe:

And yes, there’s a boring sciencey explanation for this. And no, I’m not going to tell you it.

A giant cake at the Irving truck stop.

Magnetic Hill was also special because it’s where I finally, after years of wanting one, bought a sock monkey. It is green and awesome. I’m still choosing a name.

Our 'cottage'
After a stop at Chase’s to buy some freshly-boiled lobsters, we zipped down to Seafoam and found our cottage—which turned out to be a fantastic, huge stone house. Our bedrooms are gorgeous, the kitchen is fantastic, and the view…! The ocean I’ve missed is just across a brilliant green field, where it stretches out before me in all its cold and enormous grandeur. I feel like my eyes have never taken in so much green and blue in all my life.

Brian is having a riot. My brother and his partner arrived late on the first night, with their Chinese exchange student (Jack) in tow; Brian spent the better part of the evening teaching Jack how to juggle. We curled up in bed together after an evening of fresh lobster and Canadian whiskey, we slept like babes.

Nova Scotia has welcomed us with wide open arms. We’re happy to be here. 


Friday, July 6, 2012

Play It Again Sports: Meet our new patron and savvy shopping spot!


WELCOME TO PLAY IT AGAIN SPORTS!


We have a new patron on the NEST, and we’re super excited to introduce them to you! Play It Again Sports has been in Ottawa for almost 20 years, and is a prime spot for picking up gently used sports gear—a concept that we love, because it’s ‘eco-economical’, or ‘green but cheap’. As two very active people who like to explore a lot of sports and hobbies (but maybe not stick with them forever), used gear is a helpful, handy way of keeping the cost down. And of course, for readers who have kids in sports, used gear is pretty much a necessity.

Let’s get right to the introductions! We chatted with Rob Lavoie, Regional Manager for PIAS Ottawa, and here’s what he told us.

1. WHAT IS YOUR BUSINESS NAME?
Play It Again Sports

2. WHAT IS YOUR NAME AND YOUR POSITION?
Rob Lavoie, Regional Manager of the 4 Ottawa area locations.

3. HOW CAN PEOPLE FIND YOU?
We have 4 stores in the Ottawa area: Orleans, Ottawa, Nepean and Kanata, as well as a specialized Goalie Store in the new CHDC Centre in Stittsville.
We have a website, we’re on Facebook, and on Twitter

4. WHAT DOES YOUR BUSINESS DO?
Play It Again Sports is your neighborhood sporting goods store offering new and quality used sports equipment. Kids grow like weeds, teens want name-brand everything, and you want affordable prices! That is why Play It Again Sports is the sporting goods store for the entire family. We buy, sell and trade new and used sports equipment and pass along the savings to you.

5. HOW LONG HAVE YOU BEEN IN BUSINESS?
We have been locally owned and operated in the Ottawa area for almost 20 years.

6. WHAT’S YOUR SPECIALTY?
We have two main points of difference between us and the “big box” guys:

1) Customer Service, and

2) We’ll take your trade-in to save you even more off of our already low prices. Obviously being a Canadian sports store, we have always specialized in Hockey gear and skates. We take the time to make sure you have both the proper gear and the proper fit, as this ensures that you’ll have fun and that you’ll be well protected at the same time. Having said that, we aren’t just a one-trick pony: we carry ski & snowboard gear in the winter and soccer, baseball, inlines and golf in the spring and summer. We also carry all-season apparel from Under Armour.

7. HOW DID YOUR BUSINESS GET STARTED?
We are a locally-owned member of a franchise group under the Winmark umbrella of stores. Two brothers took their love of sports and decided in 1993 to open our first store in Orleans and we haven’t looked back since, expanding across this great city of ours.

8. WHAT WARMS YOUR HEART OR MAKES YOU SMILE?
There is nothing more rewarding than seeing someone’s eyes light up as they try a new sport for the first time. It’s exciting to be a part of people and their families’ first experiences in new adventures and its fun to see customers grow and come back year after year playing sports.

9. WHAT’S YOUR ADVICE TO YOUNG NEWLYWED COUPLES?
Stay active and don’t be afraid to try new things. Bonding while trying new sports or activities is a great way to strengthen a relationship. Often money can be tight in the first few years of marriage and there are many inexpensive sports and activities to try out. Saving a few bucks picking up some gently used gear can help ease that strain as every little bit counts. Starting a healthy, active lifestyle at the outset of your life together will only lead to good habits that you’ll eventually pass along to future generations.

Play It Again Sports has four local locations, so chances are there’s a PIAS near you! Be sure to go in and say hello. And this September, all you hockey families remember that there’s a great place to get gear for your hockey players that won’t break the bank.

Welcome to the NEST, Play It Again Sports! We’re proud to have you on board.